I’ve been itching for a while to learn more about cloud server management. Sometime last year I signed up with Amazon and had a play around with some of the tools such as EC2, Elastic Beanstalk. Route 53 and I quickly setup a WordPress blog and pointed a domain name to it.
Sounds easy right?
Well it took lots of time playing around in the dashboard, looking up the Amazon docs/tutorials and some looking around YouTube for tips from the people who have done it before me. Have to admit though, the Bitnami tool did make it a lot easier towards the end.
However, since then – I haven’t really felt the urge to go back in there – I’m actually scared off a bit by how deep it can go with the wide range of services. I was looking for some comparable services at the start of this year and I heard about UpCloud. They make some fairly boastful claims about being the fastest cloud services and actually have featured quite a few articles about why they are better than the competition. Sounds like they are really going to great lengths to state their Value Proposition and differentiate themselves. And they should.
They are a recent addition to the Cloud services world, originating from Helsinki ,Finland. Their biggest claim is what they refer to as MaxIOPS block storage, which is apparently many times faster than your typical SSD VPS hosting. Their prices and features are also very competitive within the industry where market share is increasingly challenging to get a piece of. You can see why when their lowest pricing plan starts at $5 USD per month for:
- 1GB Memory
- 1 CPU
- 25GB storage
- and 1TB transfer
But what I find to be their best feature is their responsive customer service. Over the course of several days when i have had any issues, I have just clicked on their instant chat and been connected with support in minutes.
What I am going to show you is how quickly and easy it is to deploy a server from UpCloud.
Step 1 – Login to account
Firstly begin by signing up with UpCloud services. You can follow this referral link and get started with $25 USD bonus credit! Once you’ve signed up for a trial, you can go ahead and access the servers section of the website.
Step 2 – Select a server and deploy it
It’s fairly obvious what you need to do here the first time you visit this area, there is a big purple button to tell you what to do:

So by clicking on the button, it will take you through a wizard like process that will let you select the location of your server. You have the choice of several European locations, USA and lastly Singapore (which would be the best location to service most of your asian customers).

So select your appropriate location and then go further down the page to select the specs for your server. You’ve got everything starting from $5 USD a month right up to $640 USD per month with some really heavy duty server resources. For many websites, the first few options are more than enough if managed well.
Further down, you even get the option of adding extra storage devices to your setup as well. Great idea for hosting multiple file systems or deep capacity repositories to your websites and apps (i.e. great place for user info/resources to be uploaded. You get the choice of either MaxOIP or HDD storage. Of course the price differs quite a bit between the two options. My only complaint is that you have to use a slider to setup the storage space and it will not yet give you the option to type in the number you want for storage limit.
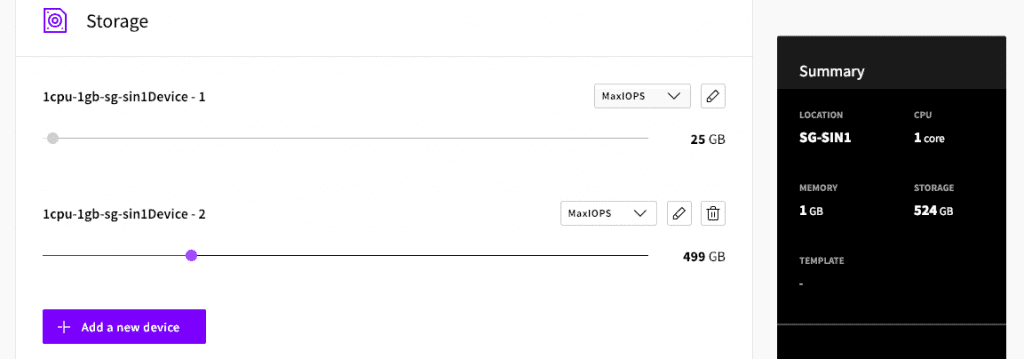
Of course at any time, you can rename your storage device names by clicking on the pencil icon.
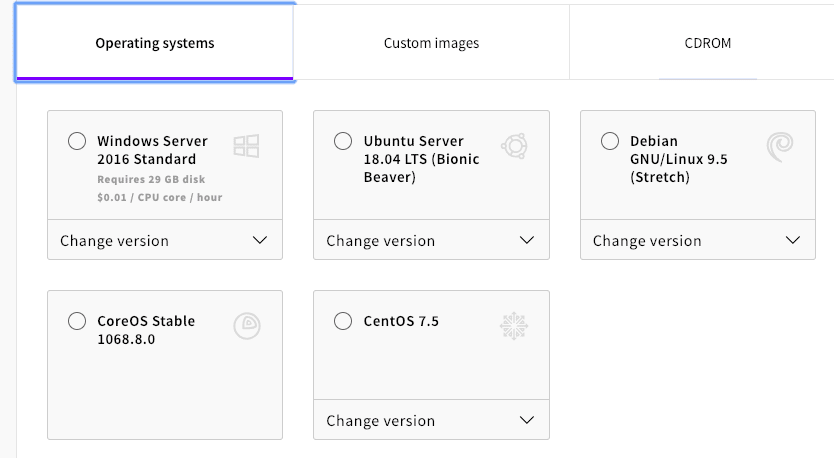
Finally, you then get the choice of server Operating System (OS) that you would like to apply to your server. All the most popular OS are there including Ubuntu, Debian, centOS – and you even have a Windows Server to setup too. From the standard configuration, you can even choose your OS version. Don’t have what you need? Click on the CDROM tab and you get to choose from countless other configurations.
Down below you can select if you want to have IPv6 support, I recommend that you do. You have a dropdown underneath that with even more advanced options including how to send your root password (after deployment), whether access is exclusively SSH keys, password or both.
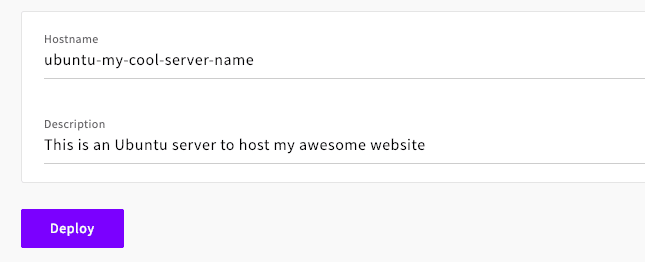
Lastly, you get the option of changing the Hostname of your server and setting up a short description that will be visible within your UpCloud server dashboard.
Well done! Now go grab yourself a coffee, tea or whatever type of beverage you want that will take a few minutes to prepare. While you wait, you can see the instance being spun up in your dashboard.
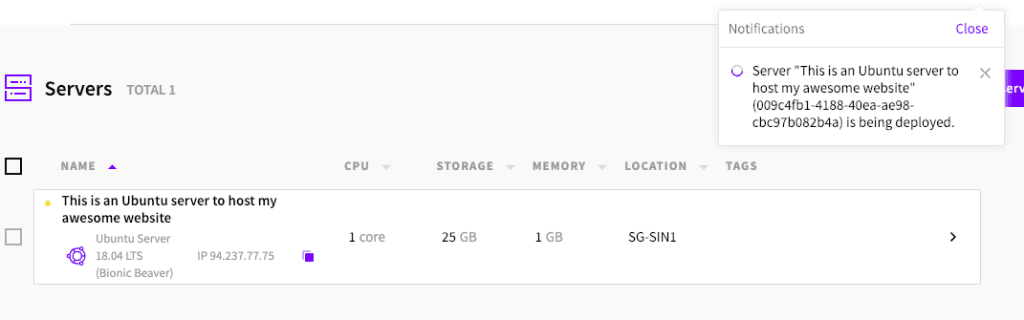
You will notice a small yellow dot on the server whilst it is being deployed. It will turn green when it is finished and also you will be provided with the server root password in the notifications panel. Careful! Make sure no one is over your shoulder checking that one out! The password also should be emailed to your account. It’s probably even a good idea to change it manually once you get it anyway (if you are like, security paranoid).
After a short while, the server will be deployed and now you can access it. Visit your dashboard and you should see a page like this:
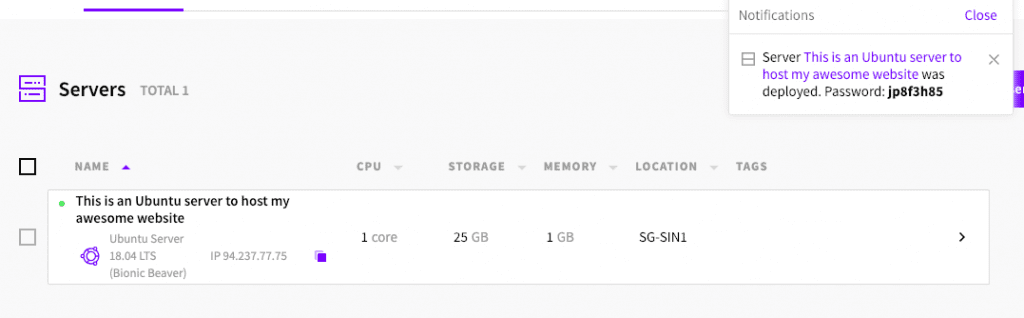
Don’t even thing of using my root password to login and access my box via the IP address. I have already deleted it before you have read this post. So just speaking on the root user, this is like GOD access, only give this access to people you really trust or preferably give it to no one at all. You really should limit the usage of this user and setup your own admin users once you can remote into the server.
Step 3 – SSH access to remote server
Now go forward and check that you have access to your newly deployed server. Open up a terminal window on your computer. Having a MacOS or Linux based machine with terminal is really helpful here. If you are “stuck” with a windows computer, yeah you are going to struggle with the Command Prompt (CMD). I would recommend installing Putty real quick and set that up.
So with a terminal window open you will need to SSH access into your remote server. To do so you need to access the server via the root user with the password that was sent to you in an email from UpCloud or shown in the dashboard notifications. In this particular case it was: ssh [email protected]
Firstly you will get a message about the authenticity of the host could not be established as it is the first time you have logged in. Then it will ask if you want to continue connecting (say yes by the way). Then you then will be prompted for the password, if that is done successfully, you will be able to access the server box and a welcome message should display giving you some information about the installation (how much resources it uses and what package updates are available). Awesome work!
Most Linux distributions already come preset with lots of helpful tools, software and apps as part of the stack. If you want to install something, do a quick check via apt-get update first just to check if it’s there first. To exit out of the remote server simply type in the command: exit
Step 4 – Setup Server package update notifications
These server instances are setup as boxes that you can access via a terminal interface. There is (by default) no nice User Interface that you can access to check for updates and stuff. You can run update commands from time to time to check for patches and updates to software installed but this is cumbersome and not really effective. If a vital security patch comes through suddenly, how are you going to know about it? Well that is why you should install Apticron. Now to be fair I think this application only runs on Debian and Ubuntu servers so centOS and Red Hat users may have to find something similar on their own.
Whilst connected to the remote host in terminal, use the command apt-get install apticron to install the application. The package will install and you will be asked a few questions within a bright purple screen. Check the first default configuration of “Internet Site” and then hit ENTER key. It will automatically detect the Hostname of your server, again just hit the ENTER key. Then the installation will complete. Once the app is installed, you will need to go in and edit the config file to put in your address so notifications about new package updates can be sent to you. So we can edit the file via the terminal window using either the nano or vim editor – but trust me, the VIM/VI editor is way better!
vim /etc/apticron/apticron.conf
Firstly select the “I” key to perform an INSERT command and then use the arrow keys to edit the line where EMAIL=”root” and insert your own email address. Now hit ESC key to exit INSERT mode and finally use :x on the keyboard to save and exit the configuration file. Now all notifications about updates to Ubuntu and Debian software packages should be sent to your email address.
However, it is more than likely that these will end up in your junk/spam inbox as the server hasn’t yet been properly setup for generating email so not many email providers are going to trust the sender and will most likely mark it as spam. Just change the rules in your email inbox and soon that issue will go away. Alternatively, you could go ahead and setup the server to have a proper mailing host.
Anyway, that’s how easy it is to deploy an UpCloud server instance.