
WordPress is a hugely popular CMS on the web and over 30% of websites are powered with it, making it the most popular CMS out there. But this also means that it is high targeted for security attacks as well. Bedrock by Roots offers what they refer to as a better structure for your WordPress site that offers enhanced security and also modernises the site architecture to behave more like a web application. This obviously makes it a great fit for managing the site within a GIT workflow.
What I want to show you in this article is how easy it is to connect an UpCloud server instance to moss.sh virtual sysadmin and easily setup a Bedrock WordPress site. After attempting to do this on my own with custom server configurations and in Docker containers, it was getting complicated. Moss.sh offers a straightforward and simple solution for this. Moss comes with free and paid tiers to help you manage your websites and makes it really easy to connect your server and manager websites and web applications. One of the best things about it – it does not sit on your server taking up your resources.
So let’s get down to business and make a Bedrock structured WordPress website. You can access the video series walkthrough here or read on below.
Step 1: Deploy UpCloud server
Login to your UpCloud account and deploy and new server instance by following up the setup wizard. Choose configuration options and location and then provide your server a hostname and description. Ignore the option for setting up public SSH key, we are going to set that up later in the Moss sysadmin panel when we connect the server instance. Then hit the deploy button and spin the instance up. When completed, you should get an email success message that will provide you with the sudo root user access details. You can use this in terminal window to get admin (sudo) access to your server. Once you have finished connecting Moss to your server (in step 3), I highly recommend that you block access for the root user to login via password for better security. For a detailed guide on this please checkout my blog post that shows you how to Deploy an UpCloud server.
You can follow this referral link and get started creating your own cloud servers in UpCloud with $25 USD bonus credit! Once you’ve signed up for a trial, you can go ahead and access the servers section of the website.
Step 2: Create SSH key pair to access server
Moss will connect to your server by creating a sudo user from the root user access (that UpCloud provides you with when you first deploy a server). However, you should create a user SSH key pair to manage your sites. Run the ssh-keygen command in your terminal window and make sure you store the SSH files locally within the .ssh folder. In this example, I created a new key and did not leave it the default name of id_rsa, but instead gave it a unique name of mosswpdemo. Make sure you run ssh-add to add the key pair to the system so it is recognised when you try to use it. Please note that you will have to store the key pair permanently in your keychain if you do not want to run ssh-add every time you reboot your computer. For more information about this, please see The Ultimate Guide to SSH – Setting Up SSH Keys.
Note the location of the SSH key pair, you will need to copy and paste the contents of the public key when you connect the server instance to Moss Sysadmin.
Step 3: Connect server instance to Moss
Sign up for an account with moss.sh if you haven’t done so already. Their free tier option is great to get you started and comes with 1 included integration and 25 GIT deploys. Integrations mean that you connect up the sysadmin to a cloud service provider (i.e. Amazon, Vultr, Google Cloud, Digital Ocean, etc). You can also do your own custom integration – which is what we are going to do with the newly created UpCloud server instance.
I recommend that you can sign up and create an account with moss.sh right now and enjoy $10 free credit! Enjoy the benefits of a clean sysadmin system to take care of your server instances and web applications.
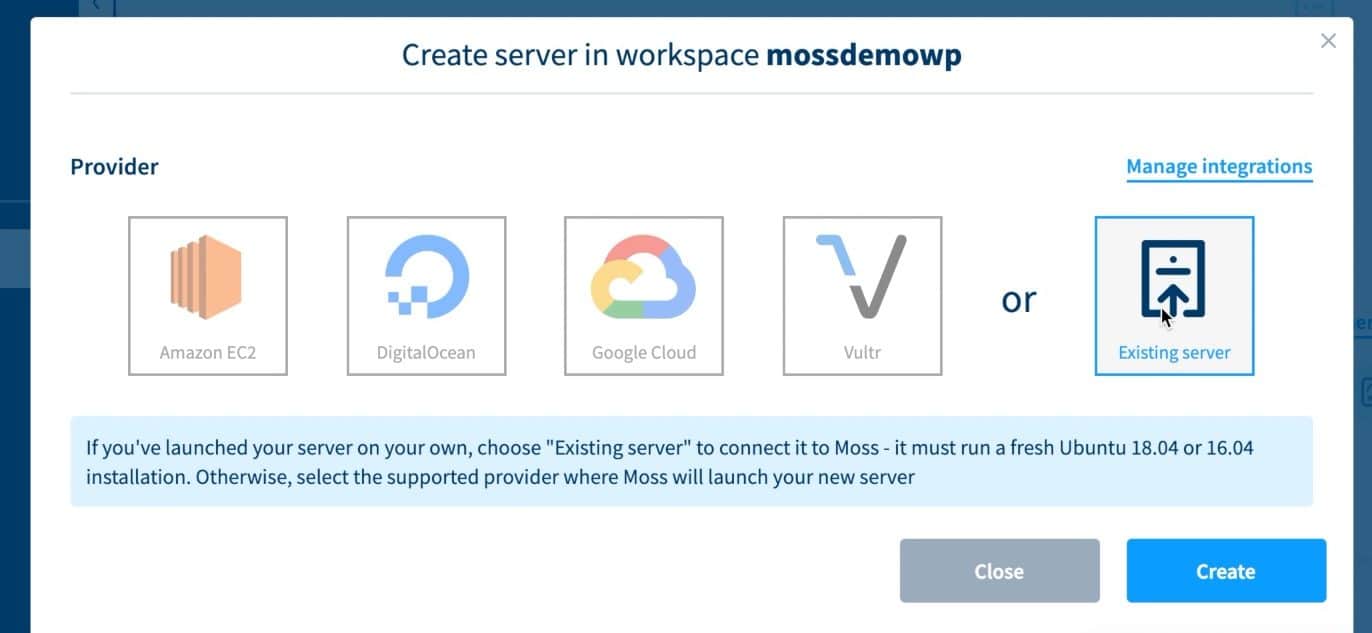
Create a new workspace in Moss and then you want to access the workspace and create a new server. This is where we are going to link up the UpCloud server to Moss to manage it. When the modal window appears, choose existing server option and then insert the IP address of the newly created UpCloud server box. Moss should automatically detect your timezone using Geolocation, and if it doesn’t go and set it yourself.
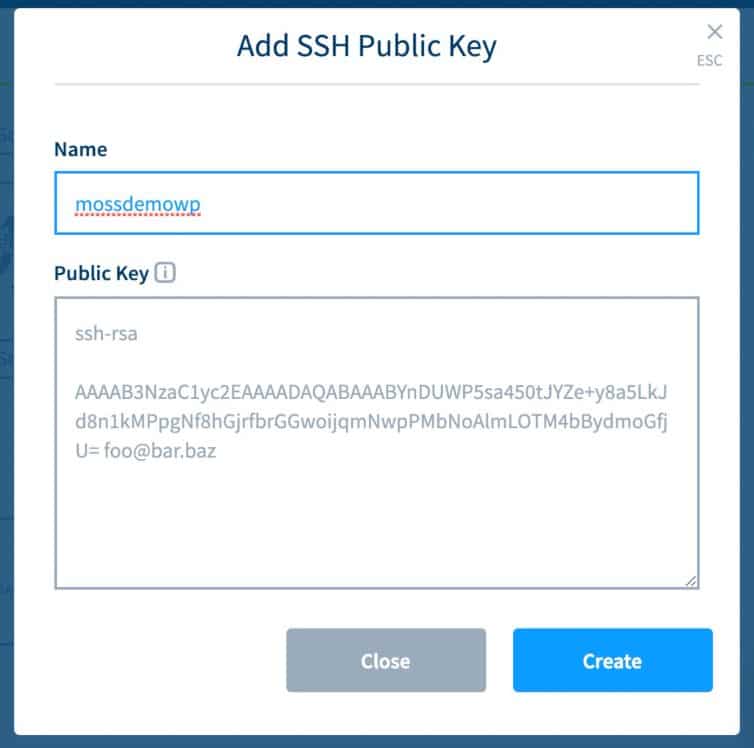
Locate the option to add the public SSH key and copy the contents from the public SSH key that you created in the previous step and paste it in here and give the public key a name so Moss can refer to it. You can use this public key for future sites/servers that you connect in Moss. This will be the user than manages the websites.
Then once you’ve set up the public key, give the server a name and then click on the ‘Create’ button. Then copy the cURL command that generates in the modal window. We are going to SSH into our server and run this command to link up Moss and UpCloud server instance.
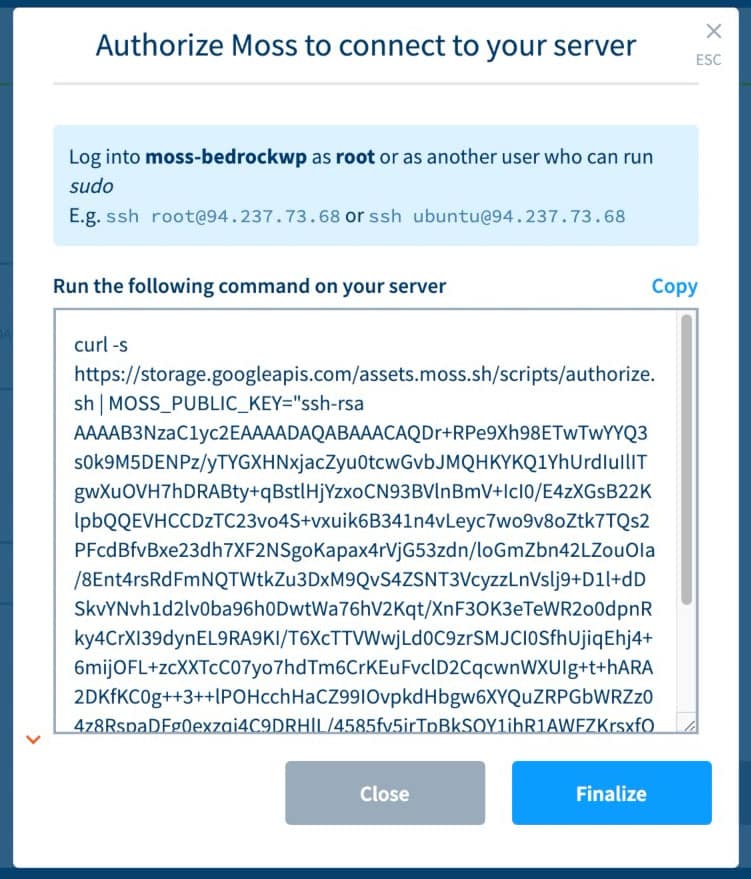
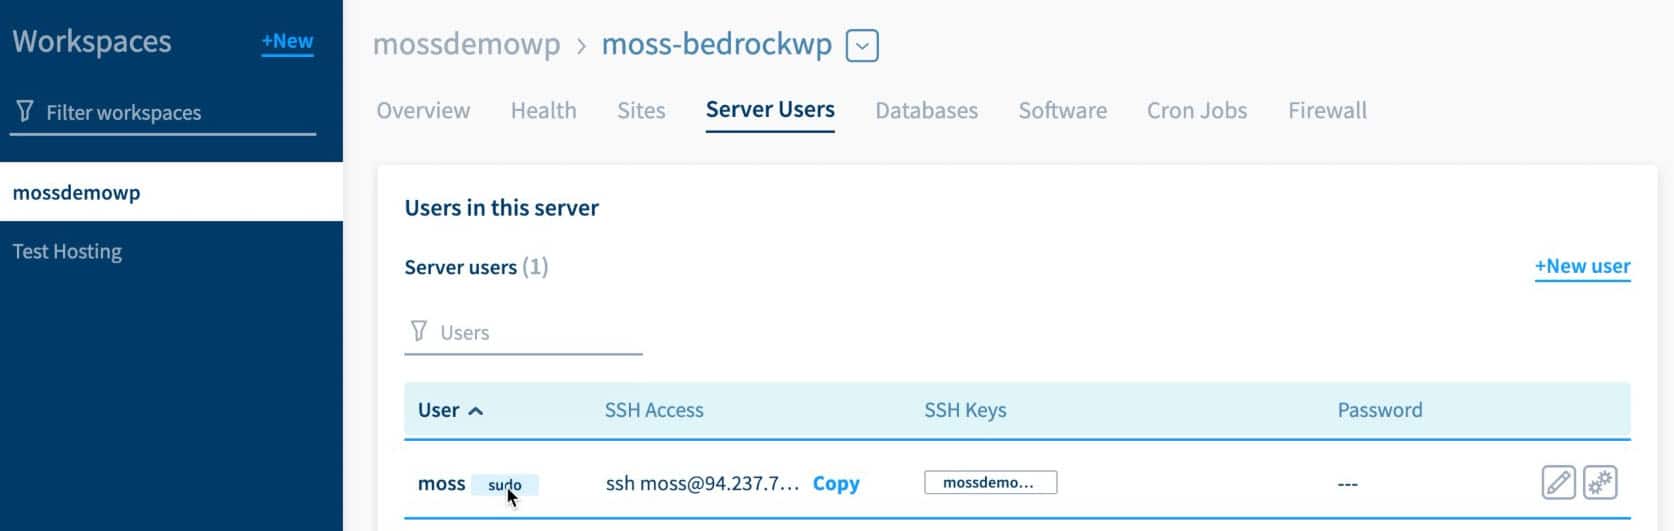
Use the root login details that UpCloud emailed you and SSH into the server using Terminal window. Then paste the cURL script and run it in the window. If everything works successfully, you will be provided with the username to pass into moss. In this instance, it is the root user. Put it into the moss modal window options and then press the ‘Finalise’ button. This kicks off the process for Moss to connect with your server and creates a new ‘moss’ sudo user that access our server and performs the necessary admin tasks. Once it is successfully created, you will be able to view it in your workspace servers panel. Note: you will see the ‘moss’ sudo user and also another user that you recently created in the panel. The sudo user is just an admin user to be used to maintain the server box and run update scripts and perform admin tasks. The user that you created will be responsible for managing the websites you create on the server – there is a key difference here.
Step 4: Initialise Bedrock project
We are going to use composer to initialise a new bedrock project on our local computer. You will need to have the composer library installed to perform this operation. It’s also best practice to setup a localhost instance of your Bedrock WordPress site as well. I recommend doing it with Local by Flywheel – very simple tool for managing localhost wp environments.
Open up the terminal window in your local computer directory (for this example, we used the Documents folder) and type the following command to create a Bedrock project:
composer create-project roots/bedrock
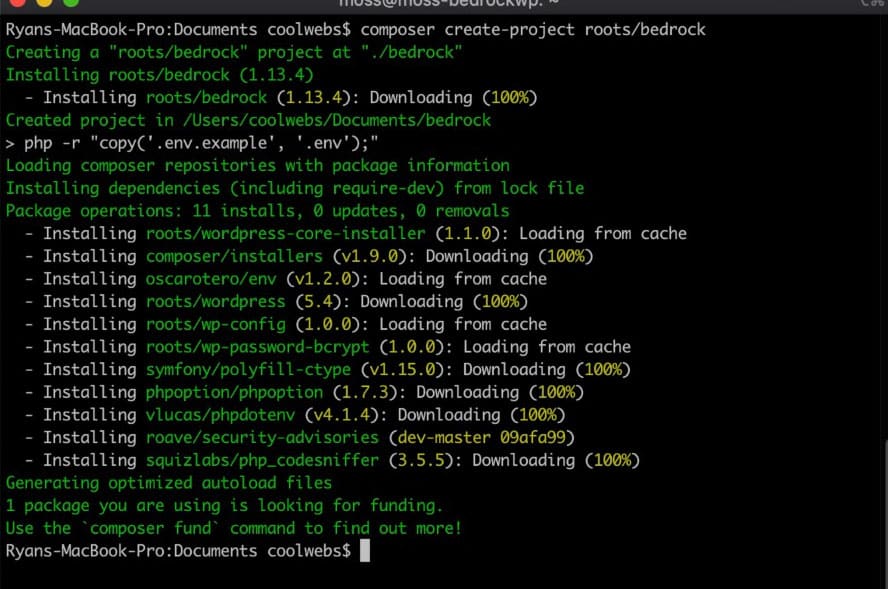 This will create a new Bedrock project on your local computer. The next thing we need to do is go and create a remote git repository to link it to. In this example, we are using GitHub but you can use whatever you like. Create the new remote repo and make sure you do not initialize it or insert any MD files, just leave it blank. After that is complete you will get a series of git commands you need to run in your local project to sync up the local and remote master branches
git initgit add .git commit -m "initial commit"git remote add origin [email protected]:<username>/projectname.gitgit push -u origin master
Once you have finished and pushed up your Bedrock files into the remote repo, go and check it out to confirm. This is going to form the deployment method for editing/maintaining our Bedrock WordPress website.
Step 5: Create new site in Moss

Access the Moss admin panel and navigate into the workspace > create a new site. Choose the WordPress option, but do not select the checkbox to install – this will perform the default WP installation and we do not want this as we are using Bedrock. Insert the domain name of your website, conveniently Moss gives you the option of using their own dummy domain name if you haven’t already set this up with a domain name provider. Then give your new site a name and create a new (MySQL) database connection by following the steps provided by Moss. Make sure you go into the ‘Advanced options’ and type ‘/web’ as the root directory. If you don’t do this, you will likely encounter issues with your Bedrock WordPress site. Finally, click on the Create button to push out the website onto your server using Moss.
Step 6: Setup the GIT deployment
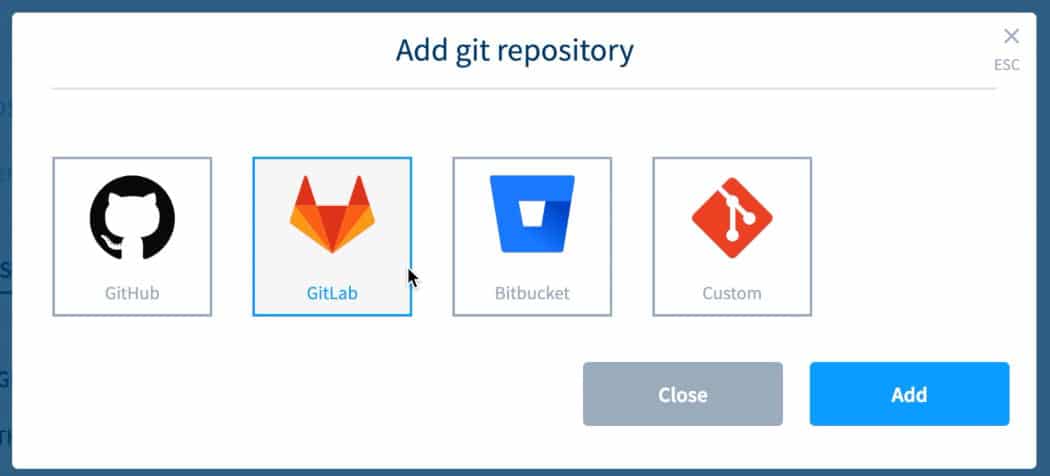
Whilst you are waiting for the site to be created, head over to the deployment tab and then add > choose repo and add the git account (we use GitHub) and then choose the remote repo that we want to use. By default, it uses the master branch which is fine in most cases.
Step 7: Create Bedrock .env file
We need to setup the .env file that will be the configuration file for our Bedrock WordPress website. It takes over the role of the wp-config.php file and what makes it better is that it is kept out of the main site files, one less security issue to worry about. So go to your local Bedrock project on your computer and create/edit the .env file to:
- Insert your database connection details
- Set up the site hostname
- Configure if for production environment
- Generate the SALTs from [insert URL]
Tip: to go get yourself a copy of a standard .env file template, head over to https://github.com/roots/bedrock/blob/master/.env.example and download. Make sure you don’t copy your .env file into your remote git repo and expose your site too!.
Once that is done, go ahead and scp the files via SSH to your server by using the following command:
scp .env username@<site-ip-address>:~/sites/<your-sitename>/shared/In this example, I used scp .env coolwebs@<site-ip-address>:~/sites/bedrock/shared/
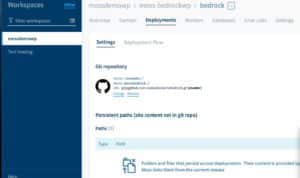
Now go back into your Moss sysadmin panel, go to the site configurations screen and set the .env file to be a persistent path. This is very important to do, otherwise you will likely encounter problems with the final Bedrock site deployment and initialisation. To set a persistent path for .env, just click on the link to add a new path > choose file > type in .env – and that is it!
Step 8: Deploy the Bedrock site
Go to website deployments > Deployment flow and select the ‘pre-install’ scripts and paste in the following:
composer install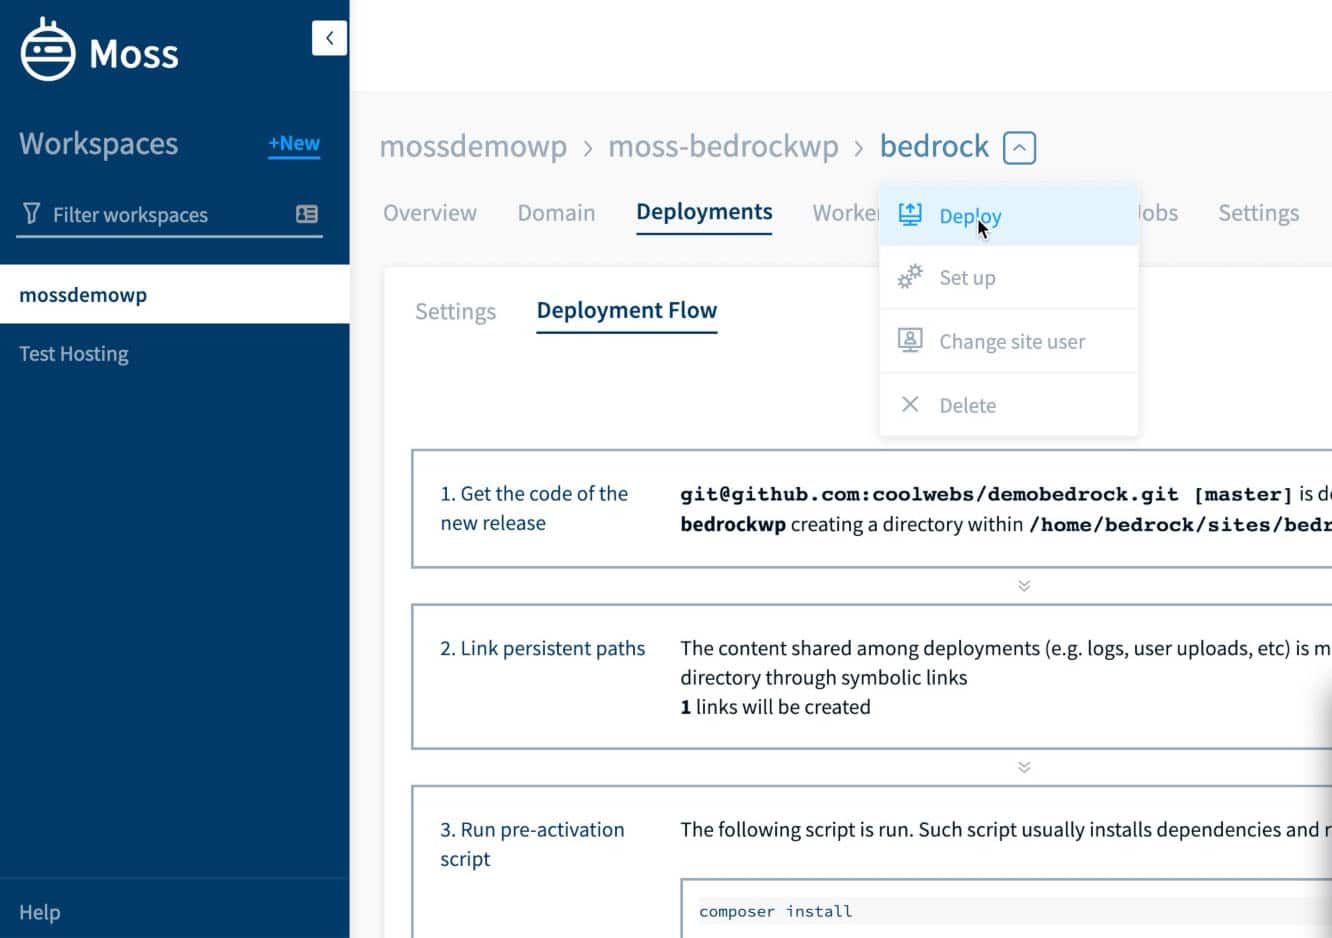 This ensures that composer is installed on the remote server which is an essential dependency for the Bedrock site to work, so it is very important. Now go and select the drop down option next to the server and select ‘Deploy’. After website is successfully deployed (check the moss notifications or wait for the confirmation email), go to the website URL and then you will be taken to the famous WordPress installation screen, except all you have to do is create the admin user, everything else has already been configured.
Login with your newly created admin details and navigate to the dashboard. You will notice that you will not have the ability to add plugins/themes from the Dashboard – and you are not supposed to. Now you should use a deployment workflow using composer or WP CLI on your localhost computer, test out updates and then push them to the master branch on your remote git repo. Of course you can create a more “rock-solid” development workflow with staging, release and pre-deploy branches and server environments – and that is totally up to you. This workflow is particularly ideal if you make custom themes/plugins and configure your own WordPress websites. Keep developing WordPress like a real web application.